Tuesday, March 21, 2006
Italian hobo bag -- complete!
My italian hobo bag is finally done! I have stuffed it quite full to demonstrate how capacious it is.

In case you are curious, here's some of the notes I took which gives you a flavor of the construction process.

For a bigger version, click the thumbnail.
In case you are curious, here's some of the notes I took which gives you a flavor of the construction process.
For a bigger version, click the thumbnail.
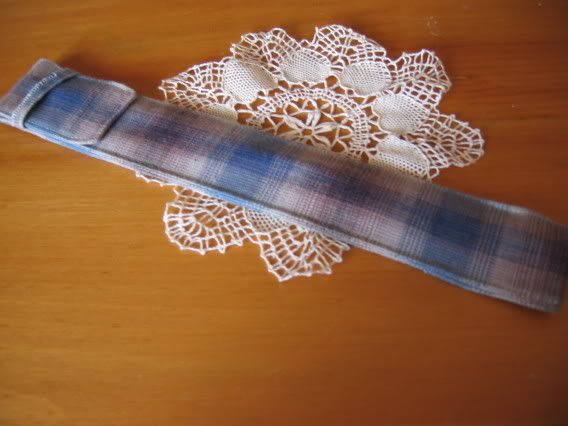
We can't all be ninjas...
...but we can make ninja headgear with just a tiny piece of fleece and some velcro.
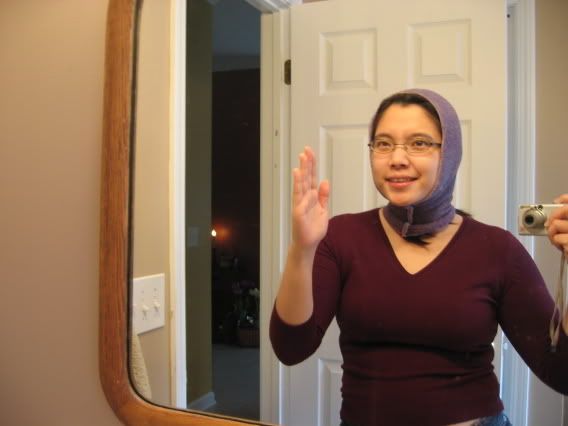
Apart from fooling people into thinking I have ninja powers, this headgear thingie also keeps my head, neck and (most importantly) ears cosy. I was thinking when I made it that I probably won't need it for another year. Then we got slammed with some of the nastiest weather all winter so I got to test-drive it after all. It works good for walking the dog. Probably won't wanna wear it into town...
Apart from fooling people into thinking I have ninja powers, this headgear thingie also keeps my head, neck and (most importantly) ears cosy. I was thinking when I made it that I probably won't need it for another year. Then we got slammed with some of the nastiest weather all winter so I got to test-drive it after all. It works good for walking the dog. Probably won't wanna wear it into town...
Monday, March 20, 2006
Who wears short shorts?
I sewed these shorts from what's left over of a half yard of plaid shirting I had left over from the tin whistle pouch project. The lack of fabric dictated the shortness of these shorts, and my inadequate drafting skills resulted in the necessity for the additional side panels to make them bigger. However, now that they're done, I really think the shortness is what makes those shorts and I really like the topstitch details that define the two little side panels. Not something I would wear out, of course, but very comfortable and cute nightwear.
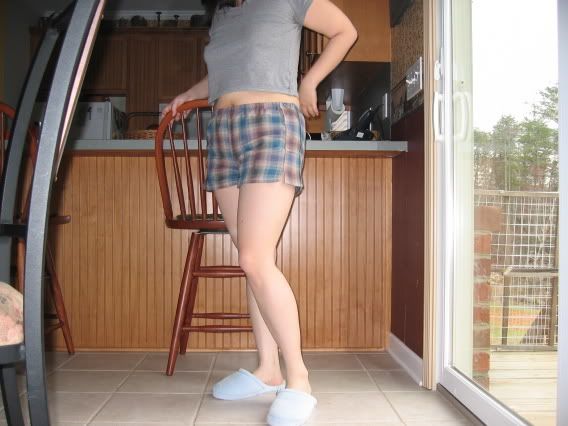
To be honest, I made those quite a few days ago (can you tell they've been slept in before I took this picture?) but hesitated to post about them because they don't look right when photographed on their own, but I wondered whether modelling such a scanty item on a publically accessable blog would be tacky. Then I got over it. After all, short as they are, theses shorts are not exactly lingerie.
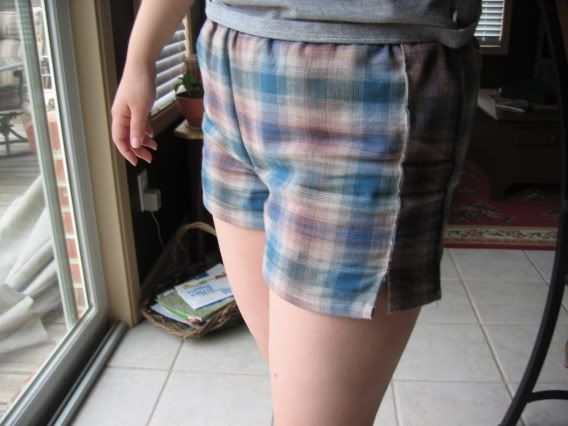
Here's a close-up picture where you can see what I mean about the side panels. I've basically just topstitched them to the back and front of the pants, leaving a little vent in the front topstitched seam for comfort. I wonder if this side-panel trick is something I can use in other apparel, even when I didn't forget to add ease when making the main pattern. They add a little style and I think they're slimming.
To be honest, I made those quite a few days ago (can you tell they've been slept in before I took this picture?) but hesitated to post about them because they don't look right when photographed on their own, but I wondered whether modelling such a scanty item on a publically accessable blog would be tacky. Then I got over it. After all, short as they are, theses shorts are not exactly lingerie.
Here's a close-up picture where you can see what I mean about the side panels. I've basically just topstitched them to the back and front of the pants, leaving a little vent in the front topstitched seam for comfort. I wonder if this side-panel trick is something I can use in other apparel, even when I didn't forget to add ease when making the main pattern. They add a little style and I think they're slimming.
Friday, March 17, 2006
"Mass" production
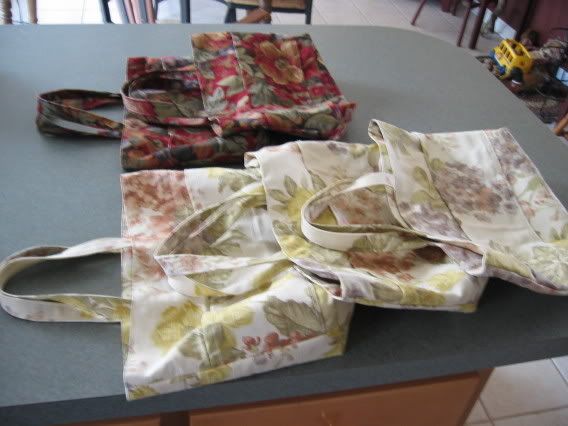
For some reason, I am really going through a phase where I really dig sewing the same patterns over and over again...I really feel like this is the way to achieve "vertical" as opposed to "horizontal" growth in your skills. Much like a musician would play a piece over and over again rather than go from piece to piece in order to gain dexterity. I feel like I'm learning a little bit more every time I sew those totes, and now that I've mastered the proportions for what I considered to be an ideal tote for this kind of fabric, I would often make quite a few.
I've put one of them up on etsy, although I'm secretly hoping that it won't sell, so that I'll have more to give away to friends.
Saturday, March 11, 2006
Still up and crafting
It's been a while since I last posted, hasn't it. I assure you, o my meagre band of readers, it is not because I have not been busy, but because I'm working on a rather involved project that will take a while to come to fruition. Of course, since I have the attention span of a fruit fly, I couldn't resist taking some diversions.
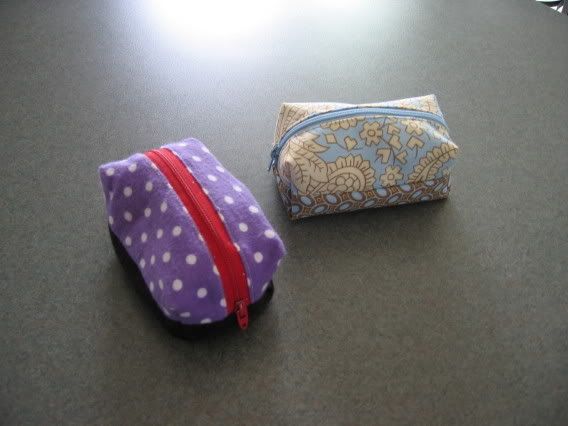
Here are some little tiny cosmetic bags from a Japanese pattern that Small Hands uploaded. I omitted the handles. I love this pattern. The end product look so smart and structured, especially when the fabric is interfaced. It's a basic pattern that I'll be able to alter for all sorts of little bags.
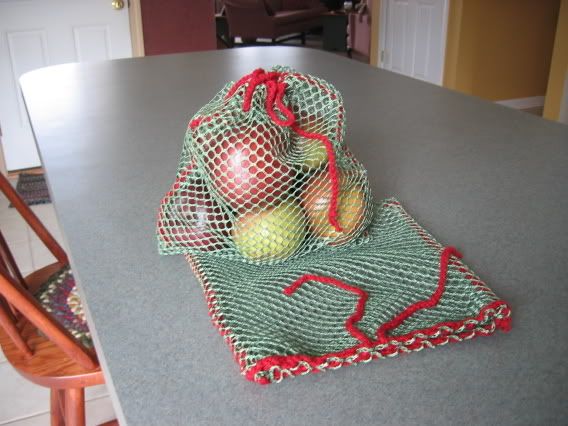
Despite the name of this blog, I'm not just a seamstress, you know. I also knit and crochet. I found this great netting material at my local fabric store for a dollar a yard. It was such a great deal that I bought two yards without knowing what I intended to do with it. The netting would be impossible to sew without manufacturing fabric strips to use as stabilizers first, which would be a pain, but then I realized that they could be croched together by hand much as the edge of a handknit sweater is finished! Adding a drawstring makes for an extremely practical little bag. I might add a tute later on to this post to explain how it's done.
Using this construction technique, I want to make a car organizer that hangs off the back of the front seat as well as perhaps a beach bag. It takes no time at all to put together.
Here are some little tiny cosmetic bags from a Japanese pattern that Small Hands uploaded. I omitted the handles. I love this pattern. The end product look so smart and structured, especially when the fabric is interfaced. It's a basic pattern that I'll be able to alter for all sorts of little bags.
Despite the name of this blog, I'm not just a seamstress, you know. I also knit and crochet. I found this great netting material at my local fabric store for a dollar a yard. It was such a great deal that I bought two yards without knowing what I intended to do with it. The netting would be impossible to sew without manufacturing fabric strips to use as stabilizers first, which would be a pain, but then I realized that they could be croched together by hand much as the edge of a handknit sweater is finished! Adding a drawstring makes for an extremely practical little bag. I might add a tute later on to this post to explain how it's done.
Using this construction technique, I want to make a car organizer that hangs off the back of the front seat as well as perhaps a beach bag. It takes no time at all to put together.
Sunday, March 05, 2006
Site to inspire
Even though I am just a humble home sewer and she is a kickass designer-entrepreneur, I'm loving Kathleen Fasanella's Fashion Incubator site and in awe of the tutorials there. It'll probably be a while before I become skilled enough to take advantage of the tutes. Meanwhile, I'm lurking and listening, and hopefully some of Kathleen's passion and exactitude would rub off on me.
The Macguyver skirt
I call this my Macguyver skirt because the construction methods were unorthodox, but everything worked. Believe it or not, the material was a odd scrap of herringbone suiting that cost less than two dollars. I bought it thinking that I was going to use a 6 gore skirt pattern I had in my stash, only to find that it came up short.
Thinking that I had very little to lose, I folded the fabric in half, then in half again. I measured my waist and my hips and divided the number which shall remain a secret by four. That number, plus some ease, gave me an idea of how wide the gores needed to be at the waist and hips. I made my marks with chalk, and, cutting through all four layers of fabric at once, I cut the gores. When I basted the panels together I was delighted to find that the curvature was a perfect fit in the rear. I then made the front flat and, reasonably happy with the fit, stitched in the zipper and finished the upper edge by enclosing in a simple waistband and hand hemmed the lower edge. Skirt done. It looks expensive. Or at the very least more expensive than $2.
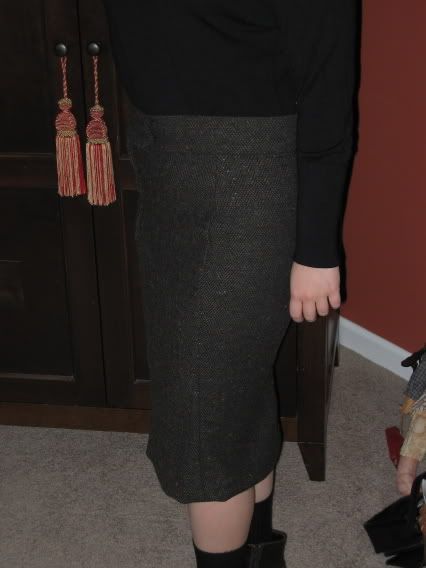
I'm sure the savvy sewers among you would be thinking to yourself around this point "hmm...a 4 gored skirt? Why is it that I never see a 4 gored skirt..." Well, the reason is that there is no good place to put the zipper if you still want to have a flat panel for the front. I did a reasonably good job lapping the zipper in the side-front, but it still looked kind of funny until I added the waistband, which was more of a feature and helped the funny zipper placement fade into the background.
It is itchy though. I need to put in a lining before I feel like I can wear this out.
Thinking that I had very little to lose, I folded the fabric in half, then in half again. I measured my waist and my hips and divided the number which shall remain a secret by four. That number, plus some ease, gave me an idea of how wide the gores needed to be at the waist and hips. I made my marks with chalk, and, cutting through all four layers of fabric at once, I cut the gores. When I basted the panels together I was delighted to find that the curvature was a perfect fit in the rear. I then made the front flat and, reasonably happy with the fit, stitched in the zipper and finished the upper edge by enclosing in a simple waistband and hand hemmed the lower edge. Skirt done. It looks expensive. Or at the very least more expensive than $2.
I'm sure the savvy sewers among you would be thinking to yourself around this point "hmm...a 4 gored skirt? Why is it that I never see a 4 gored skirt..." Well, the reason is that there is no good place to put the zipper if you still want to have a flat panel for the front. I did a reasonably good job lapping the zipper in the side-front, but it still looked kind of funny until I added the waistband, which was more of a feature and helped the funny zipper placement fade into the background.
It is itchy though. I need to put in a lining before I feel like I can wear this out.
Thursday, March 02, 2006
Just what I need...another pair of pajamas
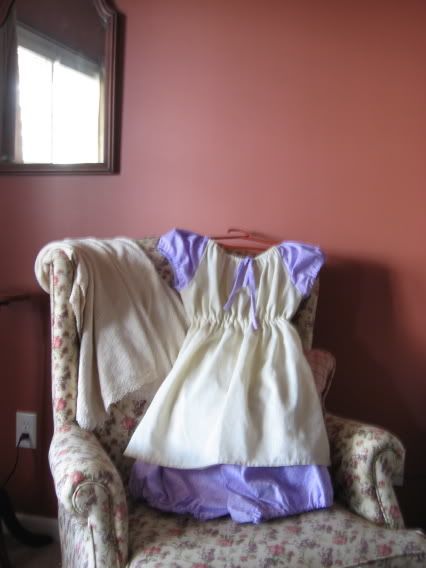
How fickle I am. I was just talking about how much I loved sewing bags and how much more fun they are than clothing items, and here I am abandoning my hobobag project halfway to sew some totally totally superfluous-to-requirement nightwear. The pattern is McCall's 3854, which is supposed to be a junior pattern, but the size 10 fits me just fine (is roomy, in fact).
I'm really pleased with how this turned out. Making the sleeves and bloomers out of a contrasting fabric definitely made the design more intersting. My only worry is that the delicate muslin fabric would not hold up properly in the washing machine. We'll see.
I also really like the top design. Made of a sturdier fabric, without a tie, I think it might be a nice peasant-style blouse.
Pouch for a tin whistle
My husband's dad asked me to make a pouch to hold the tin whistle which he gave to his friend for his birthday. Unfortunately, he did not ask me until the tin whistle is already out of his possession, so I had to guestimate the dimensions based on his descriptions..."about a foot long and as thick as your finger." Well, here's to hoping it fits.
I am always extra meticulous about my sewing when it is a gift and I know exactly who the gift is going to. I think I went a little overboard here, from ordering the kind of rustic plaid that I think would go well with a tin whistle, to choosing a topstitched pouch design that ensured there would be no raw seams inside the pouch to little touches like the hand finished blanket stitching on the top of the loop that hold the flap and the slight angling of the end of the flap to make the flap easier to insert into the loop.
Sometimes, it is very satisfying to make something very simple very well.
Thursday, February 23, 2006
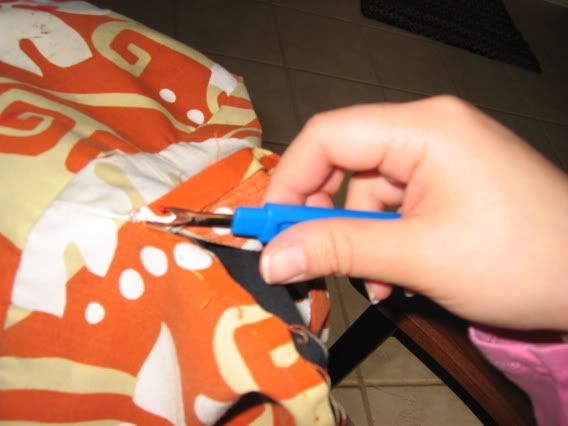
I know I know. How many bags does one girl need, right? This project is a little bit more involved...this is a hobo bag I bought in Italy a few years ago. I love it. It's easy and very versatile. But now the fabric is looking tired and stained on the bottom and I decided to take it apart so I can figure out how to sew a replica out of fresh fabric.
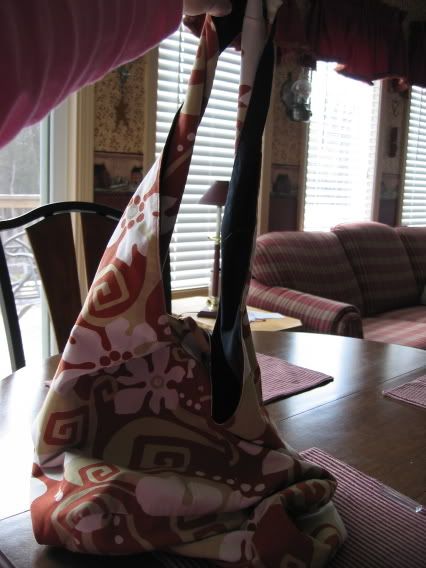
I've already made a couple of tentative copies, but I really want to get the proportions right and I'm also curious about how they did the bottom seam.
There's nothing that makes a seamstress out of you like figuring out how to do something by taking it apart. It's not just getting the pattern pieces flat. A seam reveals the secrets of how it was constructed in reverse when you slowly take it apart thread by thread. Most home sewers I know seem to shy away from the term "seamstress", and I agree it is an old fashioned term. But I like it.
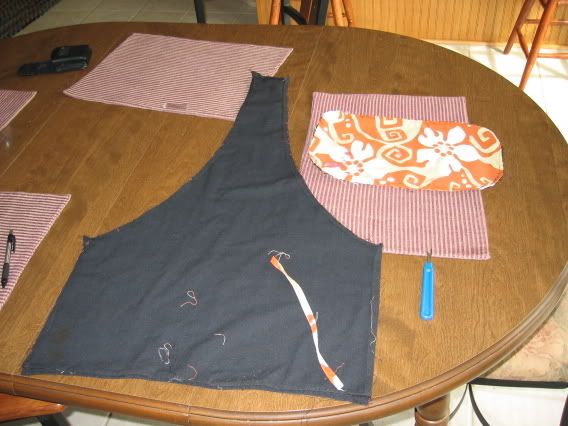
These are the relevant carcass pieces to make the pattern out of. I am going to recycle some old drapes to make those bags.
I've already made a couple of tentative copies, but I really want to get the proportions right and I'm also curious about how they did the bottom seam.
There's nothing that makes a seamstress out of you like figuring out how to do something by taking it apart. It's not just getting the pattern pieces flat. A seam reveals the secrets of how it was constructed in reverse when you slowly take it apart thread by thread. Most home sewers I know seem to shy away from the term "seamstress", and I agree it is an old fashioned term. But I like it.
These are the relevant carcass pieces to make the pattern out of. I am going to recycle some old drapes to make those bags.
Organization will set you free

This is my sewing station. I made a combination pressing surface/organizer by folding up one edge of a towel and sewing vertically into a row of pockets to keep my necessaries in. It's awfully handy. The advantage of keeping the machine on an arrangement like this is that I can press without getting out of my place. I do my pressing much more conscienciously now that I can keep my iron hot by my side to apply as necessary instead of having to schlepp the whole thing over to the ironing board.
Another organization tip for you -- I keep a metal cup inside one of the little pockets in my organizer right near the needle on the machine. Then I take care to snip my threads close to the fabric and dropping the ends into the cup. This extra fraction of a second I spend taking care of this detail on every seam saves me time in the long run as I no longer have finished work full of hanging thread ends to be snipped off and my work area is not liberally peppered with linty bits!
The big tote
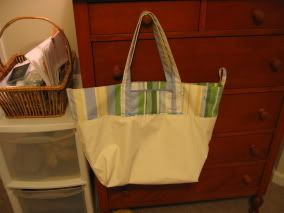
Y'all have seen the cute little totes I made using Super Eggplant's Supertutorial. But after making one cute little tote after another, I felt up to a challenge. Not only did I make this tote huge, I also dressed it up with some detail variations. Note how I made the lining much longer than the outer layer so that the extra fabric forms the top of the bag. I also folded the box bottom up and topstitched onto the right sides instead of hiding them between the two layers of the bag as usual. By making the lining longer than the outside fabric of the bag, I lowered the "hem" where they met, and therefore made inserting the handle inside this "hem" impractical. They were topstitched on, and I took the opportunity to insert a pocket between each set of handles.
Maybe some of what h just written does not make absolute sense if you have not made the totes yet. I am just realizing how limited my vocabulary is when it comes to describing my sewing work.
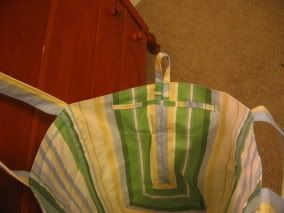
Here's a view of the inside of the tote. Note the loop I added so that this tote can be hung on a hook when it is not being used. I also added a little...doohickey...just a little strap sewn in vertically at intervals forming little loops for keeping my pens and things in. The ability to add fun little details like this on a whim is part of what makes sewing such an attractive craft to me , as supposed to, say knitting, which I also love in some ways. Now if only I can get better at describing what I'm doing.
Over all, I am pleased with this tote except for one thing -- I ran out of white thread, and used this weird peacock blue I had left over from another project instead to finish this bad boy off. It really wass too dark for the fabric, though, and every mistake in topstitching now shows. Ouch! I would be a much better seamstress if I were not so impatient! And careless! And disorganized! (Because really, there is no excuse for running out of white thread. It's disorganization). All I can say is those are all qualities I strive to improve on in my life in general as well as in my sewing, so perhaps in improving as a seamstress I can also improve my organization-fu in general.
![]()